Showing posts with label brick patios. Show all posts

Jun 2, 2024

Brick Paver Walkway Brought Back to Life!

 Before
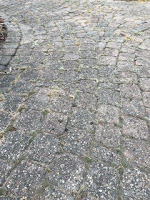
This homeowner had a brick paver walkway that was installed 32 years ago.  There has been no repair or maintenance work done to these pavers since the initial installation.  The homeowner considered having the brick walkway replaced with new pavers or concrete. 


After getting quotes for over $13,000 for replacing with new pavers and over $8,000 for a new concrete walk, this homeowner decided to go with my recommendation to "bring it back to life" with a brick paver restoration approach.  The cost for this "bring it back to life" paver restoration would be under $2,000.  The approach is to repair just some of the severely sunken pavers, but a lot imperfections would still remain.  

Before


Running a plate compactor over ALL the pavers would help improve performance by locking up the pavers.  This plate compaction also helps improve the overall appearance of the pavers.   

Powerwash cleaning the brick pavers and paver joints is a tedious job, even if using a 4000 psi powerwasher.  Great care is taken to reduce the mess from debris but using some common sense and experienced strategies makes the work successful.   

After

Clean up is done and then waiting for the pavers & pavers joints to dry begins.  The next day paver joint sand is swept in joints, blown off clean, and touched up to prepare for sealing.  

A high quality "matte" finish brick paver sealant is applied.  The first coat is a "flood coat" so it soaks into the joints, then shortly after, a light second coat is applied to adhere more sealant to the paver surface.  


After

The before & after pictures of this brick paver walkway tell the story. It is an incredible paver restoration & overall appearance but reversing the years of neglect is limited. 


I always advise if you stay on a routine brick paver maintenance program for your brick pavers, they can look like the day they were installed!

Sep 23, 2012

Small Elegant Paver Patio Installed in Ann Arbor

Brick Pavers replace Old Concrete Patio to improve Outdoor Living Space


This past week in Ann Arbor, we replaced an old cement patio with a small and elegant paver patio using Fendt's Old World Vintage.  There was limited space to work with but using some "paver quilting" ideas with patterns & color, we were able to improve this homeowner's Outdoor Living Space.

Brick Pavers has always been the most flexible pavement available for using colors, patterns, shapes, & textures, at a reasonable and affordable cost.  Brick paver patios also offer the best option in long term maintenance & replacement costs.  Performing simple seasonal maintenance requirements like sweeping joint sand each Spring, will give a lifetime of performance, function, and enjoyment.

This homeowner wanted to keep the overall theme of Ann Arbor and their neighborhood by using a tumbled old world paver laid in a simple and elegant style.  A good brick pavers contractor will exhibit their expertise with attention to detail and clean craftsmanship.  We were able to meet these expectations with great impact!

Jul 19, 2012

Simple and Beautiful Raised Brick Pavers Patio Installed

Brick Doctor Bill and crew installed this simple & beautiful Raised Pavers Patio in Scio Township, MI this past month.  We removed old wooden decks for 2 other family members of this homeowner and replaced their decks with functional, low maintenance, and creative raised brick paver patios.

 This homeowner did not currently have any outdoor living space structures and wanted us to build them a spectacular patio that they will enjoy for many years to come.  Entertainment space and traffic flow were key factors in the homeowner's needs for a paver patio.

We discussed in detail their needs and budget.  We designed and executed a simple design with some creative touches using patterns, colors, and functional paver pads.  We designed a  permanent set of Paver Steps out from their Four Seasons room that transitioned safely down to the newly installed paver patio.

Due to the large back yard, we designed a 500+ sq.ft raised paver patio area that would facilitate patio furniture, loungers, and space for entertaining.  We designed some functional paver pad areas down from the raised patio space to facilitate a grill, smoker, and decorative fire pit.  This design of added paver areas off the raised paver patio helps with traffic flow and comfort.  All of our brick paver installations are custom designed for needs & budgets.


This raised paver patio has a popular "kidney" shaped design and we custom cut each and every wall cap.  Using the traditional Holland 4X8 paving stone laid in a herringbone pattern gives this patio a dramatic look at an economical cost.  The homeowner upgraded to Fendt's Spectrum series color in the paving stones to give deep pigment color appearance.  We used a contrasting lighter color in the Wall blocks & caps framing the raised pavers patio and paver steps.  Not only did this give some dramatic contrasts but it also aids in safety.


When a raised paver patio is properly installed by a qualified brick pavers contractor, the end result in detail, execution, and construction is superior. Design, products & tools, proper compaction, and precise saw cutting all contribute to the overall success of a brick paver installation.  Long-term performance is optimal when both contractor and homeowner are educated on seasonal maintenance requirements too.

Apr 28, 2012

Unique Cafe Paver Patio in Ann Arbor

Clay pavers are Cleaned and Redesigned to create New Pavers Patio


Near the University of Michigan campus in Ann Arbor this week we installed a unique Cafe Paver Patio for a homeowner who wanted to reuse their existing clay pavers.  Currently, they had a tiny paver pad at their side entrance, but wanted to expand this area so they could enjoy an expresso in the morning. 

This paver patio project began with the need to pitch water away from the side entrance door. The existing tiny pad was too low and the current asphalt in this area pitched towards the house.  We surveyed this area to find the reference points to make sure we could pitch the pavers away from the side door and along the house. So, we were solving two needs at once... creating a beautiful small patio and pitching water away from the house.

The homeowner had some additional clay pavers onsite and we cleaned  & reused the existing pavers outside the side entrance door.  We still needed to obtain some additional clay pavers from a local supply company to complete the redesign of this new cafe paver patio. We saw cut the existing asphalt with a clean line and prepped the base as needed.

 We found a close match of clay pavers to complete this installation and by mixing all three sources, we were able to create a very natural and functional paver patio for the homeowner.  This cafe paver patio is accented with the use of a decorative rain barrel that catches the water from an adjoining downspout.

 This use of decorative rain barrels has been gaining momentum and I am an advocate of their use and function.  Any time you can avoid piping under ANY pavement, the long term headaches and repairs associated with drains can be avoided. When it comes to frost states like Michigan, piping for gutter downspouts is an on going frustration and often results in the lack of long term performance.

The adage that "beautiful things come in small packages" holds true with this cafe pavers patio redesign & installation. Though small, this paver patio packs a big punch....much like the expressos that will be enjoyed for so many years to come!

Sep 27, 2011

1 Year inspection of Creative Brick Pavers Patio we installed.

The final results of brick paver installations come to light as time goes on

Every year I will stop in and inspect brick paver installations that we installed or rebuilt the prior year.  After a year and after the first winter frost, a brick paver installation will exhibit any flaws in design or execution of installation.


From here on out, it is up to the homeowner to keep sand in the paver joints and address any areas that begin to settle or move. I was able to inspect the results of our hard work and see if the patio installation requires any warranty or non-warranty service. In this case, job well done.  I see the homeowner has kept the paver joints filled with joint sand.


The other reason I enjoy returning about a year later is the final stages of landscaping are usually completed.  The homeowner has highlighted the pavers installation with patio furniture & fixtures, flower pots & accents, and enhancing beautiful flowers, plants, trees, and ground covers. Some clients even add water features, arbors, pergolas, and awnings that give their paver installation the "wow" factor!


 This brick pavers patio installation we installed last year did not disappoint.  The homeowner did a great job landscaping and adding an eye popping pergola. We set the pillars that supported the pergola to the owners specifications and the final results look great!  The homeowner also complimented their large and functional pavers patio with great pieces of patio furniture and many accents & potted plants.


As a brick paver contractor that takes pride in his design & work, I am impressed that this homeowner took so much time to protect, enhance, and improve the appearance of their brick pavers investment.  Your brick pavers installation comes all together when the final touches of landscaping and accenting are completed.  Great job Bob, Debbie, and my crew!

Jul 15, 2011

New Life for Raised Brick Paver Patio

Raised Paver Patio in Canton Restored

Each day we are restoring Raised Brick Paver Patios in Canton that need immediate attention. Mainly due to the lack of routine long-term maintenance by homeowners over the last 15+ years, these interlocking paving stone patios have shifted & loosened over years of neglect & lack of joint sand sweepings. My team and I not only perform repair, cleaning, & sealing services, but we take the time to educate the homeowner on avoiding future costly repair costs.

If the paving stones, wall blocks, and caps are loose or drastically shifted, then the paver patio is in much need of attention.  Often the first sign of trouble is lack of paver joint sand in the paving joints. Weeds, dirt, moss, and grass take over the joints which are the most important function of interlocking brick pavers.

Another sign of distress is the "leaning out" of modular retaining wall blocks & caps that retain the patio.  Much of the "leaning" is caused by the settling of the paving stones behind the cap. When these paving stones settle below the top of the cap, water flowing over the patio begins to channel behind the wall blocks.  This slow long-term erosion and freeze thaw cycle pressure puts alot of hydrostatic pressure on the strength of the wall.  Mother nature will always win out so it is important to address these signs in a timely manner.

But not all is lost!  This particular raised paver patio in Canton was restored by my team and I for just under $2,000. We had to completely relay ALL the paving stones inside the wall blocks & caps, adjust an area of wall blocks, adhere all loose caps, and reconstruct the step at the doorwall.  We power wash cleaned the entire paver patio and swept in regular paver joint sand to prep for sealing with an approved brick paver sealant.

This particular homeowner inherited this distressed raised paver patio a few years ago when he purchased the home.  Had the original homeowner been diligent in maintaining the patio over the years, the enormous cost of repairs could have been minimal. Like any outdoor structures or pavements, touch-ups and routine maintenance is required.

If properly installed & maintained over the years, Brick Paver Patios still outperform wooden decks and stamped concreted.  A half hour of your time or paying as little as $50 each Spring to have paver joint sand swept in the paver joints can save $1000's and years of frustration & angst.

If you are experiencing the same signs or results of this once distressed paver patio, call a brick paver specialist, not a landscaper, before the winter freeze to avoid unnecessary costly repairs. Do not lose hope that your brick paver installation whether it be a patio, walkway, driveway, or porch can be restored to its original beauty & function!

Apr 23, 2011

Paver Patio Step & Soldier Course Repair in Canton


Common Elevated Brick Paver Patio Repairs

Elevated or raised paver patios in Canton usually require some touch-up repair to Steps and the soldier course row of pavers along the back of the Wall caps.  This job in Canton was no exception and our experienced & qualified crew was able to bring this elevated patio back to life!


The Paver Step was completely disassemble and rebuilt to its original height & dimensions. After 5 years of settling, this paver step became unsafe and unsightly. We were able to totally reconstruct this brick pavers step using the same blocks, caps, & paving stones.


The Elevated Patio needed a few minor repairs. There were some sunken areas along the house and most noticeably, the soldier course row of pavers immediately behind the wall caps had settled.  We removed about 2-3 rows of pavers behind the caps, re-compacted the base, added more base, reset the paving stones, compacted, and finished with joint sand.


The total cost of labor & materials was $900 and this paver patio repair had restored its original appearance and our client was ecstatic. The original pavers contractor did not educate this client about the need to sweep in paver joint sand each Spring and the need to report any major settling to avoid extensive added settling.

Our customer followed up with an email that evening ...
         Brick Doctor Bill,
Great Job!  Thanks for the quality work and staying in touch with me during the entire process.  I didn't have to call you once to ask what the status of my job was.  You gave me a time frame and contacted me as the date approached.  I can't tell you how refreshing it is to work with a company who understands customers just want to know what the status of their job is and don't want to be the one chasing down their contractor.  I will certainly recommend you to all me neighbors and will use you in the future.
Roger Runyan
 Good Brick Paver Contractors not only perform professional & quality brick paver installaitons & repair, they are honest, timely, and communicative. In times of uncertainty, it is important for homeowners to receive the "full" package of quality service & performance.

Feb 18, 2010

Brick Paver Repair or Winter Frost Effect

The Winter frost in Michigan is going to begin to thaw in March. Like most freeze thaw cycles, the devastating effects will push all pavements, even brick pavers, to their extremes. Spring is just around the corner and most homeowners will begin to come out of hibernation and stretch their arms & legs. One of the first thing homeowners do is inspect their paver patios, walks, or drives.

The beauty of interlocking pavers is their capability to expand from winter frost with minimal or no damge. The paver joints absorb the effects of frost and the high density & low absorption rate of the brick pavers keep them from cracking.  But when you are dealing with mother earth, there are no guarantees that brick repairs will not be needed from shifting or heaving.

I always receive calls from frantic customers in pre-Spring weeks that their brick patio has a huge heave or raised area.  Good News! this is interlocking brick pavers at work! After the winter frost works its way out, your brick pavers will reset. No cracks, warps, or expensive repair costs.  As the temps float over and below the freezing mark, you can literally watch your paver patio move like a waterbed mattress.

Pavers that are raised or heaved, will go down. Pavers that are down, most likely will not come up. So, you may now have some type of brick paver repair that will need to be addressed. Do not confuse that brick areas are low because other brick areas are raised.  It is not unusual in Michigan during late March to early April to see your brick patio look like pizza dough be tossed at a pizzeria.  It should all level off when it gets warm and dry and you can enjoy this one free topping.

Once the Spring weather gets warmer & dryer, do not forget the most important brick paver maintenance requirement .... sweeping joint sand in the paver joints! As mentioned in earlier posts, this will deter lateral paver shifting, base erosion, and weed growth.  So, before you call your brick paver contractor for patio repair work, make sure the winter frost has completely thawed.

Jan 24, 2010

Avoid Brick Paver Repair :Landscape No No's

Interlocking Pavers and Brick Paving


Everyday I observe what I call Landscape No No's that will result in future Brick Paver Repairs. Most homeowners and landscapers do not consider the design and installation effects their landscaping can have on the performance of their brick patios, brick driveway, and brick walkway. Below is a simple short list Landscape No No's to consider when installing your landscaping around your brick pavers.

DESIGN:
Always design your landscaping around your hardscape (pavers, home,fences,walls, etc..). It is important to design your brick paving needs and function first, then optimize your softscape (trees,bushes,beds,etc..) to accent your hardscape and home. Too often, the hardscape is sacrificed for appearance and function for the sake of a small tree or bush.

TREES:
Long-term growth of trees plays a huge part in brick paver repair. The obvious culprits are roots! Small specimen trees like Japanese maples, dogwoods, or Alberta spruces have little effect, but large evergreens like Pines, Spruces, or Firs and most deciduous trees like Maples, Oaks, and Lindens will have large future roots. These roots will surface under your paver stones and result in obvious lifts. The only way to repair pavers under these conditions is to remove the roots where surfaced but this may affect the health of the tree.

SPRINKLERS:
This is one of the most overlooked reason for brick paver repairs. Water and moisture creates erosion, freeze - thawing, and base material settling. Sprinklers should never spray on or over paver walks, paver patios, and paver driveways. The obvious problem can be continued running water over and through the paving stones, therefore exposing the paver joints, base material, and edge restraints to erosion. If any of these three paver items are compromised, the effect will be repairs and excessive brick paver maintenance. It is important to make sure that any and all sprinkler heads are at least 6" away from the edge of the pavers. Also, use drip irrigation inside all planting beds bordered by interlocking pavers patios or walks.

GUTTERS & ROOF DRIP LINES:
The neglect of homeowners or landscapers to address the water coming off the home roof is a major contributor to patio stones settling or shifting. Again, water erosion of the joint sand, base material, and paver bricks edges will cause your brick pavers to under perform. Gutters need to be redirected or have buried pipe to carry water under or around the paving stones. If you have a drip line of water coming off your roof, siding, or deck, design the brick pavers outside this drip line. You can also install a drip edge strip on your roof, siding, or deck to divert water to another spot to drip or run off.

This is a quick list of pre-design landscape requirements to help insure that you get peak performance from your landscape pavers and landscape blocks. Whether you install brick pavers, stamped or poured concrete, or wooden deck, these same Landscape No No's will apply!

Dec 12, 2009

Brick Paver Repairs for Spring

Brick Pavers

In the Midwest, the ground is beginning to freeze and Brick Paver Repairs will have to wait until Spring. I have put away my tools and will concentrate now on marketing my brick paver repair services for the Ann Arbor area. I will also spend my time analyzing the reasons for brick paver repairs and the best solutions for avoiding future repairs costs to clients. Not only at my own home, but at other clients paver installations I will observe the effects of winter freeze thaw cycles and erosion from Spring rains. This physical feedback will allow me to recommend brick paver and modular retaining wall design and installation techniques that will reduce the need for repairs.

After 28 years of designing, installing, repairing, and cleaning & sealing, interlocking brick pavers and modular retaining wall systems, I am always learning new ideas, products, and techniques that will improve the performance of brick paver patios, sidewalks, and driveways. I have spent over 2/3rds of my life in the brick paver industry and I am always challenged by the improving products and paver installation techniques. Only historical performance of paving stones and landscape blocks can be used to set the standards for brick paver design & paver installation methods.

I will continue my posts on the Steps of Installing Brick Pavers in the coming months. The next post will be on the "Bedding Course & Screeding" step of installing brick pavers. Think Spring! and I will post soon after the holidays!

Sep 20, 2009

Brick Pavers Installation : Step 1 PLANNING

For over 25 years I have been assisting homeowners and contractors with design & installation of brick pavers and modular retaining walls. Whether you are installing a brick paver patio, walkway, driveway, planter, or steps, a good guided plan is needed to insure a successful paver installation that is not only aesthetically pleasing but economical.

The PLANNING stage for a interlocking brick paver or modular retaining wall installation will be your easiest step in terms of labor, but probably the most important step. A poor plan of designing, ordering, or installing your brick paver project can lead to alot of frustration and unneccessay redo or repair.

For simplicity we will discuss a game plan for planning out the installation of a paver patio. We will also assume we do not need any steps to transition down. Start by taking measurements of the area that you want to install your brick paver patio and transfer the dimensions of the brick patio area onto some graph paper (boxes). I like to use 1 box = 1 sq.ft. (or linear foot) if the dimensions will fit on one sheet. If not, try making 1 box = 4 sq.ft ( or 2 linear feet). If your paver patio will have a curved design, use the garden hose to layout on the grass the shape & size that you are looking for. If you already have patio furniture, grill, or chiminea, place them in the patio area you mapped out to make sure you have enough room to move around comfortably. Take several reference measurements and transfer the points onto the graph paper.

Now, your first important piece of information needs to be calculated ... SQUARE FEET! This number is easily calculated by WIDTH X LENGTH = SQUARE FEET. When calculating FACE FEET for retaining walls, replace the WIDTH with HEIGHT in the equation above. By transfering your design to the graph paper, you can easily count the boxes to determine the square feet of your pavers patio, especially in a curved design. This square foot number of your brick paver installation will be the crucial information used for ordering your brick pavers, base materials, and other paver products.

The next important piece of information that you will need to know is the ...LEVEL of the EXISTING GRADE! This the level of the land in the area that you will be installing your brick paver patio. This information is very important for ordering your base materials and also important for how deep you need to dig down to install your paver base. We use a surveyors level to perform our brick paver installations but most homeowners do not need to rent one to obtain this information. Get a spool of string, a few small stakes, and line level bubble. Install a stake at the house and tie the string at the level you want your patio pavers at the house. Install another stake at the farthest point out of your patio. Pull the string from the stake at the house and wrap around the new stake while using the line level bubble on the string. Pull the string tight and wrap around the outside stake so the bubble shows level. Mark this spot on the outside stake with a marker and remove the string if you like. In the brick paver industry we will use a rule of thumb for slope of 1 inch per 10ft length. This is just a reference and you can use any slope as long as it is a "positive pitch" away from the home. The more slope you have the better but remember you do not want to create a brick paver patio that is a ramp or your furniture is leaning. 1 inch per 10ft lengths is not that noticeable to the naked eye and seems to work quite well in drainage. For our example paver patio, we will say the outside stake (patio edge) is 20ft out from the house stake. So, we will make a second mark (another color) on the outside stake 2 inches (1" per 10ft) down from the mark that was level. This will represent the height of our patio out in the yard. This is an important reference point so we can see how high our paver patio will be out in the yard. You will be able to determine whether you can just landscape up to the brick pavers or whether you will need a retaining wall to retain the patio.

The last piece of important information will come from re installing the string line from the house stake and wrapping the string around the outside stake where the outside paver patio height was marked with the slope. Now you can measure down @9-10" from this string line to reach the bottom of your digging for installing the proper paver base materials. This will answer one of the most frequently asked questions from homeowners, "How far do I dig down?".

We will go into more detail about prepping for your paver patio in Step 2 but this PLANNING stage will set the "ground work" for a better brick paver patio installation. This is the stage to mentally obsess about the details before you begin to stress your muscles with labor intensive steps, so enjoy!

Jun 1, 2009

Brick Paver Patios versus Decks


Many customers want to know the pros and cons of a brick paver patio versus a deck. For the purpose of this discussion, I will use the height of 2-3 feet to compare paving stones and modular retaining walls to wooden decks. This will eliminate the ground level (at grade) brick patio. I will use what is referred to in the brick paver industry as the "Raised Patio" for the comparison. I will use a wooden deck with wolmanized under structure with cedar or composite deck boards & rails.

Here is a picture of a raised brick paver patio for reference.

PRICE:
It surprises a lot of people that a raised brick
paver patio is price competitive to a wooden deck. Though brick pavers require a modular retaining wall system to create the outside walls & steps to meet the heights required, the cost per sq.ft. after factoring in the raised wall blocks and base material inside can be very similar to the square foot cost of a cedar or composite deck. The cost per square foot for cedar or a composite like Trex is a lot more than the square foot cost of most common interlocking brick pavers. Decks on the other hand are usually cheaper to construct the under structure or set the height than a raised brick paver patio. In the end, raised brick paver patios and decks are very similar in price.

Aesthetic Value:
The aesthetic value of brick paver patios far exceed the capabilities of wooden decks. Admittedly, composites have added a lot of value but falls short when it comes to color, shapes, and textures that paving stones offer. Paver quilting, the technique of using different colors, shapes, and textures, when installing brick paver patios, walks, and driveways has become the new craze. These added accents make each brick paver project more custom and can meet the design tastes of customers. Realtors will also tell you that a brick paver patio versus a wooden deck gives you a step ahead when selling your home. I do not claim that you will get dollar for dollar on your brick paver investment but your resale value will benefit.

Durability:
Assuming that both the raised brick paver patio and wooden deck are installed properly, the paving stone patio will outlast the deck. Composite decking will definitely increase the performance of decks, but most interlocking brick pavers and modular retaining wall systems come with a lifetime warranty from the brick paver manufacturer. The warranty is for the structural integrity of the high density concrete products. The typical pounds per square inch (PSI) density of a brick paver is 10,000 -11,000 psi. Modular retaining wall blocks are in the 6,000 psi range. Poured concrete is usually in the 2,500-3,000 psi range. The absorption rate of a brick paver is less than 3% so moisture or elements do not penetrate the brick. Therefore, the the structural integrity is not compromised like a wooden deck. Paving stones do not have to be sealed like a wooden deck to preserve their life.

Maintenance:
This one was not even close before composite decking came to light. Composite decking has less than 10 years of feedback so we will see if they present maintenance cost savings. Like I mentioned above, brick paver patios do NOT have to be sealed. Sealing is more for aesthetic value than for preservation. Decks require constant maintenance every 2 years or so in extreme climates like those in Ann Arbor. To properly maintain a brick paver patio, walkway, or driveway, you only need to keep jointing sand swept in the joints. I have gone into detail about these benefits in other posts, so I will not bore you again. Brick Pavers in general have been studied to be the most economical pavement or decking over time. Spending a couple of hundred dollars each 2-3 years for maintenance and brick paver repairs will gain endless benefit and value of your brick patio!

I hope this comparison of brick paver patios and wooden decks will help you make a more educated decision on that outdoor living space you decide to create.


May 16, 2009

The Top Brick Paver Repairs

After 25 years of installing and repairing brick pavers in Ann Arbor, I have come up with a Top List of repairs that I have seen and done. Brick Paver repairs are not uncommon in States with continued frost damage but these particular repairs are the most common.

SOLDIER COURSE SETTLING:

This particular interlocking brick paver repair is the most prevalent. This is the outside brick border that frames most brick paver patios, walkways, or driveways. It most cases, this row of "soldiers" settles or moves more frequently. The main cause is under prepping the base. Alot of installers only install the base to the exact width of the brick paver installation. When this is done, the edge restraint, plastic pvc or cement bead, is not properly installed on the same paver base material, thus this brick paver edge restraint fails and the concrete paver moves with it. It is also very important to cover the outside edge restraint with landscaping, such as, grass, ground cover, or mulch, to protect from long term erosion.
The most evident of this brick paver soldier course settling is the row of brick behind the caps of modular retaining walls and steps. Again, it is the under prepping of base behind these wall blocks. When you build up the base behind these modular blocks, you must compact carefully in 2-3" lifts. The most important step is to fill all voids or gaps with compactible base material, not sand. Over the last 8 years , the use of a geo-textile filter fabric is important to use behind these modular blocks to give added support to the base.

LOOSE PAVERS or WEED GROWTH:

This brick paver repair is the easiest to avoid, but is seldom prevented. The lock up of interlocking brick pavers occurs when the plate compactor goes over the top of the pavers, thus embedding them down in the 1" bedding course (usually a course sand). What occurs at this point is the the bedding course sand "jets up" through the joints from below. This is much like sticking your hand down into sand and the sand comes up between your fingers. The final crucial step is to then sweep an approved joint sand into all joints of your brick paver walkway, patio, or driveway, run the brick paver compactor over the entire brick installation again to jiggle down any loose sand, and then finish off with a final sweep. The joint sand keeps the pavers from moving laterally and keeps them from coming loose. Keeping the joint sand filled in the brick paver joints also helps prevent dirt or weed seeds embedding into the joints.
I will go back to brick paver installations that where installed 5 years prior, and no joint sand will be in the joints. I can stick my finger in most joints and feel the bottom of the paver. When joints are not filled, the pavers can move laterally and come loose. The most damaging effect is that water will easily come of the paver surface, tunnel down through the joints unabated, and slowly erode the the base material below.
Just 15-20 minutes of your time and $10-15 worth of joint sand each Spring to sweep your paver patio will help you avoid 100's of dollars of brick paver repairs and frustrations of a unsightly patio.

Brick Paver Dips or Waves:

This repair is usually immediately evident if a poor paver installation is performed. Keep in mind that any & all repairs are NOT the result of poor installation. The whole premise of interlocking brick pavers is to withstand the effects of winter frost or ground settling, at a minimal cost of resetting or repair. The biggest cost savings is the ability of the paver repairs service to reuse the same products, thus reducing material costs.
A poor brick paver installation can begin with a poor base preparation. Often installers cut cost & time by not excavating deep enough to install a proper base depth. A basic base material depth for patios & walkways is 4-6" and driveways 10-12". Actual base material depths vary due to weight requirements and soil conditions to name a couple. If the base material depth is compromised, your brick paver patio may not drain properly and therefore have added stress during frost periods. It is also very, very, important to compact the subsoil (dirt) prior to installing the base material on top.
Another common mistake by brick paver installers is not compacting the base in "lifts". This means they should not dump more that 3-4" thick of base material at any given time with out spreading evenly and compacting. The common brick paver compactor can not properly compact more than 4" lifts at a time. I see many contractors filling raised brick paver patios or driveways with base material over 8" high, then raking and compacting the top only! This will have an extreme effect on the performance of the brick pavers!
Another faux pas of installing paver base is not spreading and compacting in level lifts. Some paving contractors rake out, compact, and then install bedding course over a "wavy" base installation. Keep in mind that the bedding course can not make up for the uneveness of the base material in terms of long term paver performance. What you observe with base material installation will mirror the brick pavers in the future!

This is just some of the top brick paver repairs that I have seen & performed over the many years that the brick paver industry has experienced here in North America. In the fuure, I will continue my list and requirements.