Oct 25, 2011

Proper Paver Steps for Bay Windows

Steps leading to Brick Paver Patio are very important


The most important aspect of any Brick Paver Patio are the Paver Steps that are constructed to lead down from the doorwall.  For years I have watched many inexperienced landscape or so-called brick paver contractors install improper Steps at bay window doorwalls.  These are doorwalls that bump out from the wall of the home and have an open or cantilever bottom.

Many unqualified contractors try to wrap the paver wall blocks & caps around the side openings and enclose the bay window doorwall. If you encounter any brick paver installer who suggests to enclose your bay window overhang, you better run!


There are some important reasons why you should never enclose a bay window doorwall.

First and foremost, a builder will tell you that the opening under this bay window needs to have open air flow to prevent the wood from rotting underneath.  If enclosed, moisture will be constant and the possibility of the flooring inside the home being compromised. Some of these bay window overhangs have exhaust or soffit vents that need to be open.

Secondly, it is virtually impossible to properly pack the base material under the bay window to prevent the pavers and wall blocks from collapsing in over time.  After 28 years, I have never seen a set of paver steps that wrapped around and enclosed a bay window that did not require constant repair maintenance & resetting. It is one of my number one repair requests!

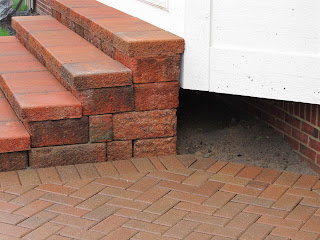
Just as important, constructing a paver step structure that is not encased within itself at a bay window doorwall is an inferior design & installation.  The wrap around approach to closing in a bay window opening with paver step blocks & caps will pull away and collapse over time.  By building a 4 sided structure up against the bay window, this paver step structure is encased within itself and therefore much stronger for long-term success. 

Basically a 4 sided paver step structure has it's own "back wall" to build up against as shown in these pictures. It is structurally sound and allows the proper flow of air under your bay window opening.  We can build them with straight or curved steps in the front leading down to the paver patio.

Most homeowners ignore the importance of the paver block steps leading down to their brick patio. Inferior design and installation will lead to years of frustration and safety issues.  Paver steps require expertise and are not cheap to build.  They are usually the most time consuming aspect of any brick paver installation.  Homeowners take paver steps for granted and pay for it in the (near) future.

A functional and creative set of paver steps can be the focal point of your paver patio, walkway, porch, or front entrance.  If you are going to cut back on expense, make sure it is not on the paver steps. There have been jobs in the past where we installed the paver steps and returned a year later to actually install the paver patio.

If your brick paver contractor is stumbling on recommendations for a paver step design, it would be beneficial for you to move on.  Make sure they supply you with a detailed description or picture of the set of paver steps you will be having installed.  If you ignore this detail of your paver installation, you may have years of aggravation and disappointment.

Here are some more ideas for Encased Paver Steps:


Oct 20, 2011

Raised Brick Pavers Patio is Rebuilt in Canton

Brick Pavers Elevated Patio with Pillars, Steps, & Sitting Walls Reconstructed


As a qualified and professional brick pavers contractor, it is always disappointing to see a brick paver patio installation failing so miserably.  The appearance of severely distressed paver installations is not indicative of a properly designed & installed project.

Usually by inspecting a failed paver installation, the signs of stress and settling will give me the clues and evidence I need to conclude the causes.  Using a simple "cause & effect" approach will reveal the needs for restoration, re-design, and long-term performance rebuilds.


Most brick paver repair situations arise due to both installing contractor and homeowner.

The contractor usually has failed in the design & execution of installing the paver project.  The contractor also has failed in educating the homeowner of the ongoing maintenance needs of brick pavers

The homeowner is usually guilty of neglecting and ignoring their paver installation. Most homeowners I deal with in extreme paver repair projects have done no maintenance on their brick paver patios, walkways, porches, driveways, etc.. over the years.  Often I am told by homeowners  " I gave up the last year or two" or "my contractor never told me I needed to perform any maintenance".  Even simple sand sweeping of joint sand in the paver joints would have tremendously reduced the amount of damage over the years.


By the time I see these extreme brick paver repairs, it is obvious that the needed repairs did not just happen in the past year.  It is usually a compilation of neglected years.  So, I can not let some homeowners off the hook for ignoring or putting off the need for a service call.  The more you wait, the more the paver repair costs will increase exponentially.

This recent rebuild project of a Raised Paver Patio in Canton was just that, a poorly executed installation and years of homeowner's neglect that put this pavers patio on the brink of collapse. Another winter frost could have given this homeowner a hot tub ride they would never forget!

The raised patio walls were leaning & gapping. The paver steps leading off the patio were caving in. The curved paver step at the doorwall was falling apart and sinking. This curved paver step was unsafe and made it impossible for their Yorkshire terriers from getting up and down.  The paving stone surface was collapsing around the inside of the sitting walls & pillars and drastically pitching back to the house foundation.


Upon close inspection, the upper paving stone surface had severely settled from water erosion. Any and all low spots began to push water into the patio retaining walls and back toward the house foundation. The flow of water was originally trapped in by the sitting walls going around the perimeter of the patio and eventually water was going to win.

Several paving stones had sunk inches below the surface and created tunnels or drains for water to flow into.  The raised patio walls did not have any filter fabric material on the inside securing the base from leaking through the wall joints.  Lack of joint sand in the paver joints was evident and by the homeowner's admission they had never swept any sand in the joints.

This ongoing process of erosion was stressing the outside raised patio wall blocks and they began to push out and fall apart.  This raised paver patio was in extreme stress and dangerously close to collapsing into the yard.  Another winter freeze thaw cycle may have been the "straw that broke the camel's back" sending homeowner & hot tub on a white water rafting ride into the yard.

We were hired to reconstruct this raised paver patio to its original beauty & function.  The homeowner's budget did not allow for replacing the current raised patio walls with a more structural wall block but I was confident that if properly reconstructed and maintained, this pavers patio can last a 20+ years.

We began by completely tearing down the raised patio wall blocks that retained the patio.  We reconstructed from the ground up, burying block below grade, installing the necessary filter fabric behind the wall that was originally missed, and designing in "relief" gaps to allow water to flow off the patio through the sitting walls.

After the outside raised patio walls were reconstructed, the upper paving stone surface was reinstalled in like design and the proper pitches away from the house foundation and into the sitting wall "relief" gaps was executed.  The paving stones were power washed cleaned and sanded.  The two sets of paver steps between the pillars leading down off the patio where releveled and the curved paver step at the doorwall was reassembled with safe rises to accommodate the yorkies.


A raised paver patio repair like this one requires a very experienced brick paver contractor to perform.  The challenge is meeting several fixed heights with products that have a variable tolerance.  Foresight, tools & equipment, experience, and detail orientation are necessary for proper execution of this brick paver repair service.  It would have been easier to perform this paver work if nothing was there to start but for the homeowner was able to save the cost of products.

Oct 16, 2011

Hold off Sealing Your Brick Pavers until Spring

Proper conditions for sealing brick pavers is important


It's now Fall in Michigan and you should hold off sealing your brick paver patio, walkway, porch, steps, or driveway until next Spring.  Sealing pavers is tricky enough and trying to force the issue this time of year may result in costly and aggravating results. Believe me when I say it will be worth the wait if anything went wrong.

Even if the weather is dry enough for sealing, low temperatures & moisture in the paver joints can have an adverse effect on the performance of brick paver sealants.   White clouding, residue, or hazing can result from sealing in non-optimal conditions.  In Michigan, it is best to seal in surface & air temperatures between 60-75 degrees.

If the air or brick paver surface is too cold, the brick paver sealant may crystallize or turn white, leaving you with a costly and timely effort to correct. If the paver joints are too moist (wet), it can leave white lines in the paver joints and on the edges of the paving stones.

Another issue late in the Fall is LEAVES!  If you avoid them from leaving any leaf stains after fall rains, it is treacherous to avoid any from falling on freshly sealed pavers.  Usually most brick paver sealants are dry to the touch within an hour, but if leaves fall and lay flat on the paving stone surface during this curing time, this will usually result in a problem. 

During the Summer if the air or brick paver surface is too hot, usually over 80 degrees, you can experience blistering (bubbles) or have a white haze trap under the paver sealant.  High humidity days are also a no no and very windy days can adversely dry sealant prematurely creating blistering. Again if you force the issue, you will spend alot of time, cost, and effort trying to correct these adverse conditions.

As a brick paver sealing contractor, there is a small window of months in a Michigan season to perform this service.  When you add in days of rain, heat, excessive winds, and unseasonably cold days, you can see the frustration of completing this paver maintenance service each year. 

Our peak paver sealing season is usually mid-May to early July, then we get another stretch from Labor Day to mid October.  I do recommend that you go ahead and complete the power wash cleaning of the brick pavers and paver joints and re-sanding of all the joints prior to Winter.  When Spring comes around, you will only need to touch up the paver joints with sand and then get ready to seal when temps allow.

As always, only use an approved brick paver sealant on your brick pavers.  Anything at Lowes, Home Depot, Menards, or a Hardware store is NOT the correct product.  Always purchase or insist on a paver sealant that is distributed by a brick paver manufacturer. These sealers will typically last for 2-3 years before you will need to consider having another application.


Ask your brick paver contractor which paver sealant he is using and ask that he write down the brand of sealant or leave the empty container (properly sealed up) behind.  This way you can use the same brick paver sealant for future applications. Make sure prior to sealing that all paving stones and paver joints are dry.

Oct 15, 2011

Crumbling Steps at Front Porch replaced with New Paver Steps

Mortared Brick or Tiled Steps in Michigan will fail over time


This homeowner was in immediate need of having there deteriorating Front Steps replaced with a long-term solution.  After many years of frustration and hiring 3 different contractors over the past 12 years to fix these steps, it was our time to come to the rescue.

I suggested we install modular retaining wall block & cap Steps, usually referred to as Paver Steps, because they will give the best performance and least maintenance over the years.  If any of the coping units (caps) come loose, they can easily be adhered without any signs of repair. Any of the riser step blocks can be reset at little cost and effort too.


Outdoor mortared brick steps will fail over the long-term in Michigan due to freeze thaw cycles which break up the mortar and loosen the bricks. Even more so, ceramic or granite tile used for outdoor non-covered porches and steps are also not a long-term solution. The grout will crack and chip and allow tiles to come loose and pop off.


The homeowner really wanted to keep the tile on the top of the porch since that was in good condition . We carefully installed the Paver Steps to meet the finished height of the tile and filled the joint behind the coping with some grey HP Polymeric Sand to match the existing grout in the tiles.


We finished this paver project by power wash cleaning and re-sanding the paver joints of the front walk which completed the whole restoration. There are never any "permanent" solutions to steps in frost states (considering moderate costs) but the best solution is Paver Steps. They offer great performance, very low maintenance, and low repair costs if needed.

Oct 3, 2011

Paver Patios Repair, Cleaning, and Sealing

Paver Patios restored to original beauty will bring many years of enjoyment again


This past week we restored several brick paver patios to their original beauty and function. These paver patios needed minor repairs, cleaning, sanding, and sealing to bring back the life and appearance these homeowners once enjoyed.

A few homeowners thought they needed to replace their old paving stones with new ones to get the appearance they wanted. I was able to assure them that a less expensive option was available.  We repaired settled areas as needed, cleaned the paving stones & joints to bring back some color & texture, and then completed the paver restoration process with sealing the paving stones with a long lasting and approved paver sealer.

Some other homeowners had tried to restore or repair their own paver patios but without the results that an experienced brick paver contractor can return.  I commend their effort but if you are not patient, experienced, or have the proper tools, the paver patio restoration results will fall short. 

If you are discouraged with your brick paver patio, walk, steps, porch, driveway, etc.. due to its unsightly appearance, don't fret!  They can be restored and made beautiful again. Call a qualified brick paver contractor today to see your options and associated costs.

Oct 1, 2011

Restoration of Brick Paver Patio & Walkway in Canton

After 13 years, this Raised Paver Patio needed some Repair & Restoration


In Canton, MI there are 1,000's of raised paver patios that need some attention.  This homeowner hired the original installing contractor who did not instruct him to sweep joint sand in the paver joints. The contractor also did not prep him for the event of the outside row of brick pavers settling behind the raised wall caps.  If unattended, the wall blocks & caps will begin to settle and lean out, leading to a more costly paver repair work. 

This paver patios wall blocks & cap started to sink in one area and the rest of the patio walls were at risk because 3 to 4 rows of  brick pavers were sunk below the height of the caps.  The homeowner contacted us at the right time to repair this patio before the cost became more expensive.


We lifted up and relaid 1-2ft of brick pavers behind the entire raised paver wall caps, re-leveled @6ft of wall blocks & caps that dipped, and reset some sunken individual brick pavers throughout.  We power wash cleaned all the brick pavers, wall blocks & caps, and the paver joints.  We re-sanded the entire pavers patio and ran the power plate compactor over the patio to relock up all the paving stones.


The paver walkway leading from the dirveway to the patio had become loose, gapped, and crooked from lack of attention over the years.  We relaid half of the brick paver walkway to straighten out the crooked lines and gapped outside row of pavers.  We also power wash cleaned the entire paver walkway and joints.  We finished with re-sanding the paver joints and ran the plate compactor over the walkway to relock the paving stones.


To complete this total paver patio restoration, we returned a few days later to seal the paver patio and walkway with an approved brick paver sealant.  Sealing enhanced the color and brought this 13 year old, neglected, brick paver patio back to life!  Now with continued low maintenance steps of sweeping joint sand in each Spring and resealing in 2 to 3 years, this pavers patio should perform beautifully for 20+ years.

Sep 27, 2011

1 Year inspection of Creative Brick Pavers Patio we installed.

The final results of brick paver installations come to light as time goes on

Every year I will stop in and inspect brick paver installations that we installed or rebuilt the prior year.  After a year and after the first winter frost, a brick paver installation will exhibit any flaws in design or execution of installation.


From here on out, it is up to the homeowner to keep sand in the paver joints and address any areas that begin to settle or move. I was able to inspect the results of our hard work and see if the patio installation requires any warranty or non-warranty service. In this case, job well done.  I see the homeowner has kept the paver joints filled with joint sand.


The other reason I enjoy returning about a year later is the final stages of landscaping are usually completed.  The homeowner has highlighted the pavers installation with patio furniture & fixtures, flower pots & accents, and enhancing beautiful flowers, plants, trees, and ground covers. Some clients even add water features, arbors, pergolas, and awnings that give their paver installation the "wow" factor!


 This brick pavers patio installation we installed last year did not disappoint.  The homeowner did a great job landscaping and adding an eye popping pergola. We set the pillars that supported the pergola to the owners specifications and the final results look great!  The homeowner also complimented their large and functional pavers patio with great pieces of patio furniture and many accents & potted plants.


As a brick paver contractor that takes pride in his design & work, I am impressed that this homeowner took so much time to protect, enhance, and improve the appearance of their brick pavers investment.  Your brick pavers installation comes all together when the final touches of landscaping and accenting are completed.  Great job Bob, Debbie, and my crew!

Sep 26, 2011

Common Pavers Step Repair: Replacing Step Caps

Brick Paver Steps can be restored, repaired, or replaced at a nominal cost

We performed a very common brick pavers step repair this past week. We replaced old deteriorating paver step caps that became unsightly & unsafe with new and improved paver step caps.  I see this type of paver repair on a daily basis and there is a simple solution we can perform assuming the paver step has not settled or became un-level.


Paver step caps, especially for the front entrance, are challenged over time due to heavy traffic and the common use of rock salt during the Winter months in Michigan.
 

This paver step was still level but the step caps were severely pitted and deteriorating fast.  To the homeowners own admission, they excessively rock salted during the winter months which compromised the structural integrity of this product.

We easily removed the existing step caps and re-adhered new paver caps to bring there entrance back to life. We reset the brick pavers immediately behind the step caps and swept in new paver joint sand.  This total paver repair was only $150 which included the cost of the new paver step caps. The cost of this step cap replacement was far under the cost to replace or re-surface cement steps or wooden steps.

The advantage of modular retaining wall blocks & caps is the low maintenance and cost of freshening up or repairing in the future. After 12 years from the initial installation of this front porch step, this new step cap replacement made the entrance look new again and the homeowner is very pleased. I advised them to use white pellet snow melt on their paver porch, step, and walkway in the future. It is less damaging on high density concrete products and performs better melting ice.

Sep 18, 2011

Should you wait until Spring to have your Brick Pavers Repaired?

The decision to wait to have your Brick Paver Patio or Walkway repaired can be more costly

This time of year I have alot of potential clients who decide to wait until Spring to have their brick paver patios, walkways, driveways, porches, etc.. repaired or restored.  In many ways, this decision can be much more costly.  It is important to heed the advice of a reputable and honest brick pavers contractor who will explain the pros & cons of when you should have these paver repair services performed.

I am a consumer too so I always believe that a good qualified contractor should not always be trying to get the work or job today. A good brick paver contractor will present you with the best economical & timing options that best meet your needs and budget.

This all came to light recently when we performed some major repair & design change work to a large raised paver patio installation in Plymouth, MI.  The homeowner was in dire straights with a paver patio that was collasping quickly.  An unqualified landscape contractor did the original work only 4 years ago. This patio installation was unsafe and close to collapsing into the back yard.

This raised brick paver patio needed approx. 50-60% rebuild and the customer did not have the budget for this work at this time.  The homeowner was considering waiting until Spring and using next years tax return to fund the repairs.  The issue became that by waiting through another Winter, this raised paver patio will suffer more damage & settling which will effect the remaining 40-50% of installation.  This of course will greatly increase the cost needed to repair & restore this paver patio.

I spelled out a 2 phase plan that would be more economically feasible for the homeowner at this time while protecting the rest of the raised paver patio from further damage. The first phase was to rebuild & redesign the outer retaining wall foundation of this raised paver patio to keep it from collapsing into the yard and protecting the upper level from further damage.  Much like a house, you must secure the foundation first, then address the rest of the structure in the future.

The second phase will be to return in the Spring and redesign & repair the paver steps leading into the house,  relay the ground level patio & walkway, and rebuild the sitting walls & pillars.  When we complete this total restoration of these multil-level paver patios & walk, the homeowner will deservedly enjoy their paver installation as originally expected.

The extent of repairs for this brick paver installation is an embarrassment to my profession. The lack of attention to construction detail & execution from this landscape contractor has resulted in a "scar" for the appearance, performance, and industry of paving stones and modular retaining wall blocks & caps.

The point made here is that by waiting to repair or restore the settling of brick pavers or wall blocks will result in additional areas settling, leaning, or gapping at an exponential rate. Winter frost will be the most damaging force on compromised paving stones and wall blocks.

The biggest concern I see on a daily basis is the settling of the paving stones directly behind the wall caps.  Instead of rain water flowing over the top of the the caps and off the patio or steps, it runs down behind the wall blocks & caps and slowly erode the base. The hydro static pressure on the walls, especially when frozen during the Winter, will certainly push on the retaining wall system and result in extreme leaning and/or collapsing.

Sometimes the simple cost of repairing or resetting pavings stones will protect the extensive & expensive cost of repairing wall blocks. I have mentioned several times in earlier posts that sweeping of paver joint sand seasonally is the most important factor of brick pavers, but making sure your paver installation is in optimal condition leading into the Winter is the next.

If your brick pavers patio or walkway will require complete reconstruction, it usually does not matter whether you have it done in the Fall or Spring.  The main concern would be safety or risk of water getting into the home during Fall or Winter.  Once the ground is frozen, proper paver repair services can not be performed.

The other factor to keep in mind about whether to have your pavers repaired in Fall or Spring is the cost.  Most brick paver contractors like myself will give a better price to perform these restoration services in the Fall over the high demand of our services in the Spring.  Typically, my prices are 10-15% less in the Fall because we will have gaps in our schedule to fill due to lower demand & leads.  In contrast, Spring prices reflect new higher costs of products, labor, insurances, etc.. that need to be covered to meet minimum margins. 

I know it is easy to put off your paver patio or walkway repair for the Spring, but for those that are cost conscious, it will behoove you to consider doing these repairs this Fall to save costs and/or added future repairs. Remember that "an ounce of prevention is worth a pound of cure!"

Sep 11, 2011

Small Brick Paver Walkway Installed in old neighborhood in Ann Arbor

Clay Pavers over Cement slab and bordered with wood timbers are replaced


This week in near downtown Ann Arbor we replaced an old clay paver walkway that was installed over the old cement slab walk and bordered with wood landscape timbers. This was a cosmetic solution by the prior owner to dress up the curb appeal of the home to sell, but over the long-term this application was going to fail.

  The old existing walkway was showing signs of distress and becoming unsightly. The cement slab below would heave up the clay pavers during winter frost and the wood landscape timbers began to rot & bow.  Since the clay pavers were not set over a properly draining base, they did not properly perform and became uneven, loose, and gapped.


 The new homeowner wanted to improve the appearance of her home and at the same time, remove the small step up at the city sidewalk that was causing tripping.   The new homeowner wanted to use a style of brick paver that was traditional to the theme of old Ann Arbor. I suggested we use the most traditional shape, 4X8 inch rectangle, laid in a popular herringbone pattern.  The outside edges are outlined with a soldier course border to "picture frame" the walk and prevent small cut pieces to come loose.


  We removed the clay pavers which were in great structural shape and donated them to a local youth camp.  The old cement slab was removed and the soil was excavated to the proper depth. The excavated soil was compacted, the base material was installed & compacted, and  the bedding course was leveled and pitched properly.  The new high density concrete interlocking pavers were installed in a soft curved design and flared at the city sidewalk.

This small brick pavers walkway is a simple and affordable solution to improve the appearance, safety, and value of a home. Front walkways are a integral part of any home's curb appeal and lure. Choosing interlocking brick pavers as a replacement of old concrete sidewalks is a feasible and economical solution.